
Some more excellent methods of making TableViews more flexible! 🎉
- Approach #1: “Easy”
- Approach #2: Enumeration
- Approach #3: Protocols and Generics
Brilliant. 🤓
Some more excellent methods of making TableViews more flexible! 🎉
Brilliant. 🤓
Thomas Hanning has a great overview of the use-cases for stored properties and computed properties here.
Essentially, stored properties allow you to perform actions as the property’s value is about to be set (using willSet {}) or after it has been set (using didSet {}). With computed properties, you can also calculate a new value on the fly without storing a default value.
How I refactored my app’s Settings screen code to be much more flexible and readable, while unlocking a more complicated TableView at the same time! Win-Win!
I stumbled upon this amazing post by Frédéric Adda over at Nova Era called Structure Your UITableView Better with Structs and Enums in Swift as I was searching for a way to refactor the Settings page in my app, BB Links, to make it easier to add in new settings options anywhere, or change around any items/sections, without needing to manually worry about the section and row index numbers.
The linked post above explains how you can use enums and structs to replace the indexes for section and rows–it’s really cool!!! 😎 Exactly what I was looking for! Below is my implementation of it for my app’s Settings screen, and I took this concept even further later on in so I could easily have different Dynamic Prototype Cells! 😱
With this change, I can move any item to any section and change the order of sections and items all within a couple of seconds! To do that with section and row indexes requires a bunch of index changes which can get confusing to keep track of.
Here’s how I set it up in my app, first implementing the enums and structs, as Frédéric’s article suggested:
private enum SectionType {
  case Account
  case Other
}

private enum Item {
  case ManageAccounts
  case ActiveAccount
  case DefaultCountry
  case AboutMe
  case Donate
  case RateApp
  case ShareApp
}

private struct Section {
  var type: SectionType
  var items: [Item]
}
First, I created the SectionType enum which represents the different sections I want to have in the Settings screen. I have an Account section and Other.
Next, I create the Item enum which contains all of the different tableView rows I have in the Settings screen.
Lastly, a Section struct is created which is identified as containing a SectionType enum and an array of Item enums.
Once those three components were set up, the next step was to create an instance of an array of Section structs, which will hold the various sections in the Settings screen.
class SettingsViewController: UIViewController {
  private var sections = [Section]()
  ...
}
In the viewDidLoad() method, I assign the items that belong in each section:
override func viewDidLoad() {
  super.viewDidLoad()
  // Setup sections/rows for table
  sections = [
    Section(type: .Account, items: [.ManageAccounts, .ActiveAccount, .DefaultCountry]),
    Section(type: .Other, items: [.AboutMe, .Donate, .RateApp, .ShareApp])
  ]
  ...
}
The Account section contains the ManageAccounts, ActiveAccount and DefaultCountry tableview rows, and the Other section contains the remaining four rows.
Next up…the UITableViewDataSource implementation which I have as an extension to my SettingsViewController class.
// MARK: - UITableViewDataSource
extension SettingsViewController: UITableViewDataSource {
  func numberOfSectionsInTableView(tableView: UITableView) -> Int {
    return sections.count
  }

  func tableView(tableView: UITableView, numberOfRowsInSection section: Int) -> Int {
    return sections[section].items.count
  }

  func tableView(tableView: UITableView, titleForHeaderInSection section: Int) -> String? {
    switch sections[section].type {
    case .Account:
      return "Account"
    case .Other:
      return nil
    }
  }
  ...
}
For tableView:numberOfSectionsInTableView:, you just return the count of your sections array, which will be 2 as it contains my two Section structs.
for tableView:numberOfRowsInSection:, return the count of items in each section, and for tableView:titleForHeaderInSection:, I setup a switch statement to switch through the types, returning the name for each section. (For Other, I just wanted it to be blank, so I didn’t return a title).
Before I show how I used these enums and structs to help me easily implement three different dynamic protoypes, here’s how I implemented the UITableViewDelegate methods:
// MARK: - UITableViewDelegate Methods
extension SettingsViewController: UITableViewDelegate {
  // Goes to product detail when cell tapped
  func tableView(tableView: UITableView, didSelectRowAtIndexPath indexPath: NSIndexPath) {
    switch sections[indexPath.section].items[indexPath.row] {
    case .ManageAccounts:
      performSegueWithIdentifier("ManageCoachIDs", sender: self)
    case .ActiveAccount:
      performSegueWithIdentifier("DefaultCoachID", sender: self)
    case .DefaultCountry:
      performSegueWithIdentifier("DefaultCustomerCountry", sender: self)
    case .AboutMe:
      performSegueWithIdentifier("About", sender: self)
    case .Donate:
      performSegueWithIdentifier("Donate", sender: self)
    case .RateApp:
      rateApp()
    case .ShareApp:
      shareAppFrom(indexPath)
    }
    tableView.deselectRowAtIndexPath(indexPath, animated: true)
  }
}
I just switch between the section and row using the sections array, and perform my segues or functions for each Item. It’s all very clear what is what thanks to the Item enum setup earlier! I love it! ❤️ Without this setup, you’d just have combinations of sections and row index numbers and you’d need to keep track of which is which with comments. And don’t even think it would be simple to switch them around. With the way this is setup, it really doesn’t matter which order you put the case Items…it’s all handled by the way you place them in your section variable up in the viewDidLoad()! Brilliant! 🙌
For the final part, I’ll show how I easily implemented my three dynamic prototype cells, which are just a simple Basic Cell, a Subtitle Cell and Right Detail Cell (setup as such in the storyboard with appropriate cell identifiers):
Here’s how my storyboard is setup:

And implementation of tableView:cellforRowAtIndexPath::
func tableView(tableView: UITableView, cellForRowAtIndexPath indexPath: NSIndexPath) -> UITableViewCell {
  // Setup a cellIdentifer string to store the cell reuse identifier you want to use for each row.
  var cellIdentifier: String

  // Switch through each row and set the appropriate cell reuse identifier
  switch sections[indexPath.section].items[indexPath.row] {
  case .ManageAccounts, .AboutMe, .Donate:
    cellIdentifier = "BasicCell"
  case .RateApp, .ShareApp:
    cellIdentifier = "SubtitleCell"
  case .ActiveAccount, .DefaultCountry:
    cellIdentifier = "RightDetailCell"
  }

  // Populate your cell reuse identifier into the cell
  let cell = tableView.dequeueReusableCellWithIdentifier(cellIdentifier, forIndexPath: indexPath)

  // Switch through each cell, and implement the labels/setup for each row
  // The order of the cases is irrelevant!
  switch sections[indexPath.section].items[indexPath.row] {
  case .ManageAccounts:
    cell.textLabel?.text = "Manage Coach IDs"
  case .ActiveAccount:
    cell.textLabel?.text = "Active Coach ID"
    let coachID = dataModel.getActiveCoachID()
    if coachID != "" {
      cell.detailTextLabel?.text = coachID
    } else {
      cell.detailTextLabel?.text = ""
    }
  case .DefaultCountry:
    cell.textLabel?.text = "Default Country"
    cell.detailTextLabel?.text = dataModel.getDefaultCountry()
  case .AboutMe:
    cell.textLabel?.text = "About the Developer 💪🤓"
  case .Donate:
    cell.textLabel?.text = "☕️☕️☕️?"
  case .RateApp:
    cell.textLabel?.text = "Rate BB Links ⭐️⭐️⭐️⭐️⭐️"
    if let reviewCount = reviewCount {
      cell.detailTextLabel?.text = "\(reviewCount) people have rated this version"
      UIView.animateWithDuration(0.3, animations: {
        cell.detailTextLabel?.alpha = 1.0
      })
    } else {
      cell.detailTextLabel?.text = " "
      cell.detailTextLabel?.alpha = 0.0
    }
    cell.accessoryType = .None
  case .ShareApp:
    cell.textLabel?.text = "Share BB Links 🗣👥"
    cell.detailTextLabel?.text = "Know a coach who would love this app?"
    cell.accessoryType = .None
  }

  // Return the cell
  return cell
}
I love the way this worked because it’s clear exactly which row I’m working with, and I can quickly change the cell type by moving around the row Item where the cellIdentifier variable string is set in the first switch statement and changing its cell implementation details! So. Much. Clearer! 🙌
With all of this setup the way it is, adding new sections or rows is a cinch! I could totally rearrange this tableView to look completely different switching a couple of lines of code. The normal way would be way more difficult.
Here’s the finished result in-app:
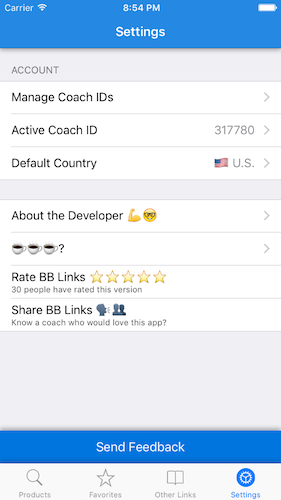
It’s now setup for quick modifications in the future! 🎉
If you ask me, enumified tableViews with dynamic prototype cells rock! 😎
Thomas Hanning outlines how to use the new defer keyword in Swift in his blog post.
Essentially, the defer keyword executes its block before exiting the scope it is contained within. It’s a great tool to ensure you do any clean-up code required, even if an error is thrown.
It’s almost like a deinit() block for your own functions!
Check out his full post here: http://www.thomashanning.com/swift-2-0-defer/
My first app, written 100% in Swift, is live!
Day 1 downloads were 4,135—way beyond what I was hoping to achieve! And 99.9% crash free, and the 2 crashes that did occur weren’t due to my app. #bugfree

I didn’t do any press releases or use any app marketing sites. Word just spread like wildfire through the Team Beachbody network about my app starting yesterday morning once I shared it with some coach friends. I had Beachbody Coaches emailing me, messaging me, commenting on my social media—all thanking me profusely for releasing this app and ultimately saving them time and frustration in the future! I saw a problem and ventured out to solve it. 🙂
It’s a niche app (for Beachbody Coaches to help run their businesses), but feel free to check it out to see how it works!

Justin
Here’s a quick little demo of how my app works!
#BeachbodyCoach
Little Bites of Cocoa is a blog I recently discovered that offers some truly great bite-sized snippets of knowledge via a newsletter. It’s a good way to keep on top of new best practices and bits of knowledge.
In the latest newsletter, a bunch of handy Swift tricks were featured, with my favourite being this one:

It’s helped me cut way down on the pyramid of doom! And what’s even better is you can even throw in a condition using the where keyword to the end of the chain. 😍 brilliance.
Check out the rest here: https://littlebitesofcocoa.com/175-more-swift-tricks
Not sure who to follow to learn Swift and iOS development? 😖
This is an excellent list of websites, newsletters, bloggers and tweeters! I’ve got many of them on the watch already, and will be adding some more after having read this page!
Follow the best and you’ll become better! I promise. 🤓
Excellent bunch of tips to write Swift better—exactly what I like to see!
My favourite tip is the first (improve the readability of constants) as I havent seen that one before! Most of the rest are great best practices I’ve seen and have started using often (more type safety by avoiding ! and more guard!)
Check it out: http://savvyapps.com/blog/swift-tips-for-developers
