
How I refactored my app’s Settings screen code to be much more flexible and readable, while unlocking a more complicated TableView at the same time! Win-Win!
I stumbled upon this amazing post by Frédéric Adda over at Nova Era called Structure Your UITableView Better with Structs and Enums in Swift as I was searching for a way to refactor the Settings page in my app, BB Links, to make it easier to add in new settings options anywhere, or change around any items/sections, without needing to manually worry about the section and row index numbers.
The linked post above explains how you can use enums and structs to replace the indexes for section and rows–it’s really cool!!! 😎 Exactly what I was looking for! Below is my implementation of it for my app’s Settings screen, and I took this concept even further later on in so I could easily have different Dynamic Prototype Cells! 😱
With this change, I can move any item to any section and change the order of sections and items all within a couple of seconds! To do that with section and row indexes requires a bunch of index changes which can get confusing to keep track of.
Here’s how I set it up in my app, first implementing the enums and structs, as Frédéric’s article suggested:
private enum SectionType {
  case Account
  case Other
}

private enum Item {
  case ManageAccounts
  case ActiveAccount
  case DefaultCountry
  case AboutMe
  case Donate
  case RateApp
  case ShareApp
}

private struct Section {
  var type: SectionType
  var items: [Item]
}
First, I created the SectionType enum which represents the different sections I want to have in the Settings screen. I have an Account section and Other.
Next, I create the Item enum which contains all of the different tableView rows I have in the Settings screen.
Lastly, a Section struct is created which is identified as containing a SectionType enum and an array of Item enums.
Once those three components were set up, the next step was to create an instance of an array of Section structs, which will hold the various sections in the Settings screen.
class SettingsViewController: UIViewController {
  private var sections = [Section]()
  ...
}
In the viewDidLoad() method, I assign the items that belong in each section:
override func viewDidLoad() {
  super.viewDidLoad()
  // Setup sections/rows for table
  sections = [
    Section(type: .Account, items: [.ManageAccounts, .ActiveAccount, .DefaultCountry]),
    Section(type: .Other, items: [.AboutMe, .Donate, .RateApp, .ShareApp])
  ]
  ...
}
The Account section contains the ManageAccounts, ActiveAccount and DefaultCountry tableview rows, and the Other section contains the remaining four rows.
Next up…the UITableViewDataSource implementation which I have as an extension to my SettingsViewController class.
// MARK: - UITableViewDataSource
extension SettingsViewController: UITableViewDataSource {
  func numberOfSectionsInTableView(tableView: UITableView) -> Int {
    return sections.count
  }

  func tableView(tableView: UITableView, numberOfRowsInSection section: Int) -> Int {
    return sections[section].items.count
  }

  func tableView(tableView: UITableView, titleForHeaderInSection section: Int) -> String? {
    switch sections[section].type {
    case .Account:
      return "Account"
    case .Other:
      return nil
    }
  }
  ...
}
For tableView:numberOfSectionsInTableView:, you just return the count of your sections array, which will be 2 as it contains my two Section structs.
for tableView:numberOfRowsInSection:, return the count of items in each section, and for tableView:titleForHeaderInSection:, I setup a switch statement to switch through the types, returning the name for each section. (For Other, I just wanted it to be blank, so I didn’t return a title).
Before I show how I used these enums and structs to help me easily implement three different dynamic protoypes, here’s how I implemented the UITableViewDelegate methods:
// MARK: - UITableViewDelegate Methods
extension SettingsViewController: UITableViewDelegate {
  // Goes to product detail when cell tapped
  func tableView(tableView: UITableView, didSelectRowAtIndexPath indexPath: NSIndexPath) {
    switch sections[indexPath.section].items[indexPath.row] {
    case .ManageAccounts:
      performSegueWithIdentifier("ManageCoachIDs", sender: self)
    case .ActiveAccount:
      performSegueWithIdentifier("DefaultCoachID", sender: self)
    case .DefaultCountry:
      performSegueWithIdentifier("DefaultCustomerCountry", sender: self)
    case .AboutMe:
      performSegueWithIdentifier("About", sender: self)
    case .Donate:
      performSegueWithIdentifier("Donate", sender: self)
    case .RateApp:
      rateApp()
    case .ShareApp:
      shareAppFrom(indexPath)
    }
    tableView.deselectRowAtIndexPath(indexPath, animated: true)
  }
}
I just switch between the section and row using the sections array, and perform my segues or functions for each Item. It’s all very clear what is what thanks to the Item enum setup earlier! I love it! ❤️ Without this setup, you’d just have combinations of sections and row index numbers and you’d need to keep track of which is which with comments. And don’t even think it would be simple to switch them around. With the way this is setup, it really doesn’t matter which order you put the case Items…it’s all handled by the way you place them in your section variable up in the viewDidLoad()! Brilliant! 🙌
For the final part, I’ll show how I easily implemented my three dynamic prototype cells, which are just a simple Basic Cell, a Subtitle Cell and Right Detail Cell (setup as such in the storyboard with appropriate cell identifiers):
Here’s how my storyboard is setup:

And implementation of tableView:cellforRowAtIndexPath::
func tableView(tableView: UITableView, cellForRowAtIndexPath indexPath: NSIndexPath) -> UITableViewCell {
  // Setup a cellIdentifer string to store the cell reuse identifier you want to use for each row.
  var cellIdentifier: String

  // Switch through each row and set the appropriate cell reuse identifier
  switch sections[indexPath.section].items[indexPath.row] {
  case .ManageAccounts, .AboutMe, .Donate:
    cellIdentifier = "BasicCell"
  case .RateApp, .ShareApp:
    cellIdentifier = "SubtitleCell"
  case .ActiveAccount, .DefaultCountry:
    cellIdentifier = "RightDetailCell"
  }

  // Populate your cell reuse identifier into the cell
  let cell = tableView.dequeueReusableCellWithIdentifier(cellIdentifier, forIndexPath: indexPath)

  // Switch through each cell, and implement the labels/setup for each row
  // The order of the cases is irrelevant!
  switch sections[indexPath.section].items[indexPath.row] {
  case .ManageAccounts:
    cell.textLabel?.text = "Manage Coach IDs"
  case .ActiveAccount:
    cell.textLabel?.text = "Active Coach ID"
    let coachID = dataModel.getActiveCoachID()
    if coachID != "" {
      cell.detailTextLabel?.text = coachID
    } else {
      cell.detailTextLabel?.text = ""
    }
  case .DefaultCountry:
    cell.textLabel?.text = "Default Country"
    cell.detailTextLabel?.text = dataModel.getDefaultCountry()
  case .AboutMe:
    cell.textLabel?.text = "About the Developer 💪🤓"
  case .Donate:
    cell.textLabel?.text = "☕️☕️☕️?"
  case .RateApp:
    cell.textLabel?.text = "Rate BB Links ⭐️⭐️⭐️⭐️⭐️"
    if let reviewCount = reviewCount {
      cell.detailTextLabel?.text = "\(reviewCount) people have rated this version"
      UIView.animateWithDuration(0.3, animations: {
        cell.detailTextLabel?.alpha = 1.0
      })
    } else {
      cell.detailTextLabel?.text = " "
      cell.detailTextLabel?.alpha = 0.0
    }
    cell.accessoryType = .None
  case .ShareApp:
    cell.textLabel?.text = "Share BB Links 🗣👥"
    cell.detailTextLabel?.text = "Know a coach who would love this app?"
    cell.accessoryType = .None
  }

  // Return the cell
  return cell
}
I love the way this worked because it’s clear exactly which row I’m working with, and I can quickly change the cell type by moving around the row Item where the cellIdentifier variable string is set in the first switch statement and changing its cell implementation details! So. Much. Clearer! 🙌
With all of this setup the way it is, adding new sections or rows is a cinch! I could totally rearrange this tableView to look completely different switching a couple of lines of code. The normal way would be way more difficult.
Here’s the finished result in-app:
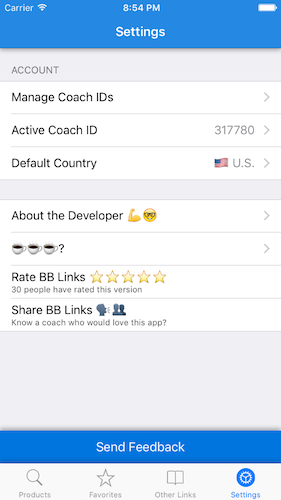
It’s now setup for quick modifications in the future! 🎉
If you ask me, enumified tableViews with dynamic prototype cells rock! 😎

Hey, thanks for the reference, glad my post could be useful to you !
LikeLiked by 1 person
No problem! Thank you for posting it! 🙌
LikeLike
Hey Shyam! Glad it’s useful in some way, and I’m sure eventually it will all make sense. 😀
With static cells, they only work in storyboards as they don’t use a data source. So this wouldn’t work as everything above is to create the table’s data source. To populate static cells, you would just manually populate their data directly in the storyboard. Static cells do have some limitation as to what’s possible with them, which I think is why you’re asking if this would work with them.
I say give dynamic cells a shot in code and see if you can get close to what you’re looking for.
LikeLike
Hey Shyam sorry I missed this!
Can you go to your storyboard and change the style to Grouped instead of Plain? That should do it, although it will change the style of your section headers.
An alternative way to get rid of the extra blank rows while keeping the table style as Plain is to add this line of code to your viewDidLoad (assuming you already have an outlet hooked up to your tableview):
tableView.tableFooterView = UIView()
This just adds a blank footer to your table’s bottom so instead of it filling the space with blank rows (since by default there is no footer on a Plain style tableview), it fills it with the blank footer you just added.
Let me know how those options work!
LikeLike
Hey Justin. It’s me who has to be sorry for missing this for an even longer time.
Thanks very much for the help, though. Coming to your suggestions, I had tried both and below is my observation.
Option 1: Changing to grouped from plain, was straight forward. It did the trick for me. I’ll be following it.
Option 2: Adding a blank footer, removed the cells but filled the blank space with white.
Thanks again.
LikeLike
Hi Justin, its my turn for being sorry, to not able to respond quickly on your suggestion.
But, I have now tried both and would go with the first one.
Option 1: Changing to Grouped from Plain, did the trick as I wanted it to.
Option 2: Adding a blank footer, clears the cell, but the space is filled with white!!
Finally, thanks again for your continued support. 🙂
LikeLiked by 1 person
Yup…what you would need to do is make a new custom nib/xib with a tableview cell and add your custom elements such as a switch and give it a reuse identifier. For the switch to work, you would need to create either a delegate or closure for the cell so you can react to the switch being toggled on or off.
This post was an excellent one to show how to do it with closures: http://candycode.io/how-to-properly-do-buttons-in-table-view-cells-using-swift-closures/ and there was an original post that did it with delegates: http://candycode.io/how-to-properly-do-buttons-in-table-view-cells/.
LikeLike
Hi Justin,
I did go through those blogs, and was able to include quite a few elements. But I had to have dynamic footers for my sections. I used tableView.reloadSections and tableView.reloadRowsAtIndexPaths, and they seem to work as I wanted. But, the tableView is messed up as I scroll. Not sure, if you have encountered this, but there is either something wrong with how these methods work, or I must be using them in a wrong manner.
I would like to mention that if they are used only once, it’s fine. Only multiple use of the above methods, cause UI discrepancy.
LikeLike
When you say “methods” above, which methods are you referring to? And what exactly do you mean by the tableview screwing up on scroll—what UI element doesn’t look right?
LikeLike
‘reloadSections’ and ‘reloadRowsAtIndexPaths’ are the methods I used to update the values of the cells, if there is a change in the values behind the scenes. Example, a UISwitch needs to be turned off/on based on some other criteria.
The rows get jumbled up into different sections. So, a row which was supposed to be in section one, might end up in section two, and if we scroll again, it might move to section three, or return to section one.
I don’t see a way of sharing the video of this, else I would have. It is best explained, while in operation. Or, you can try it yourself. I believe it to be a bug, and assume that a radar has been filed already!
LikeLike
Any reason why you wouldn’t just use tableView.reloadData() instead to reload the entire table’s data?
Are you doing any changes to the actual structure of the sections/rows once the view is loaded, or is the table’s datasource structure constant?
LikeLike
As I had a few UISwitch elements, I needed the value to change accordingly and many other similar use cases, I figured out that these methods had to be used.
Nope the structure doesn’t change!! It will be as it was setup.
To be a bit more clear, let me explain it along with a snippet from my code..
switch sections[indexPath.section].items[indexPath.row] {
case .ShowCloudMusic:
cell.callback = { (switch) -> Void in
userDefaults.setBool(cell.value, forKey: cloudMusicKey)
tableView.reloadSections(NSIndexSet(index: indexPath.section), withRowAnimation: .Automatic)
}
cell.switchCellLabel?.text = “Show Cloud Music”
cell.switchCellSwitch.on = userDefaults.boolForKey(cloudMusicKey)
cell.selectionStyle = .None
So, this would be one of the cases, where I intend to convey the user, whether the UISwitch is on/off. I’d like to change the footer as well. And having tableView.reloadSections in the “callback” does that
And, I have another scenario, when I need to modify the detailTextLabel, after segueing back. And this comes to the rescue again.
So, would you advise to use tableView.reloadData? I don’t think it will do the trick. Actually, when I used it in lieu of tableView.reloadSections, not a single cell was visible!!
LikeLike
I’m having a hard time visualizing everything and seeing how it’s all connected. Is it possible to put it on dropbox or somewhere and emailing me a link to check it out? justin dot stanley at gmail dot com.
LikeLike
Justin,
I have the email sent across. Please check your inbox, and dig in when you’ve got time.. 🙂
LikeLike
Hi!
It’s a really good stuff. Thank you.
Do you have any idea, how can we implement a search to the table of this king?
Thanks.
LikeLike
Hmm…that would be a tough one. You need some sort of data source to be able to filter. The cells would all have textLabel’s, and those have text, so you could instead store those as a computer var on the Item enum and then set that down below in the switch where you set the cell’s text. But because there are sections and items in each section, to filter for search, you’d need to show/hide the appropriate matching cells as the user types. This would complicate things…
LikeLike
can i have your above mentioned project ?
LikeLike
Hey Vamsi!
I had just pulled this code out of my App Store app, so unfortunately can’t provide the project.
Is there something specific that you need help figuring out?
LikeLike